
Pam Benchley is a master trainer for Stages Cycling. She has compiled the following tips on introducing your new power bikes to your members. While most of them are universal for all bikes with power, a few of the tips are specific to the Stages power console. You may need to modify slightly for different bikes.
It’s official—your facility is getting new bikes with power! Congratulations!
Getting new equipment—any equipment—is always exciting. Getting new bikes with the latest technology is not only exciting, it can also be a bit intimidating for both instructor and user as well.
How do you introduce this new technology to riders who have never experienced power before? A good idea is to schedule a series of introductory sessions that are 20–30 minutes long to allow you to introduce your current members to the new technology. After that (or if these sessions aren’t possible at your facility), you can incorporate some of the following information into the beginning of your classes.
To ensure success for you and your participants follow these three ideas:
- Keep it Simple.
Make sure they know how to turn on the console and how to read the data. Introduce it to them in a simple, easy-to-understand way. You can skip the lecture on FTP and watts/kg ratio in the early stages. Now is the time to help them understand that watts are a measurement of how hard they are working, and that how to create more watts is highly individual.
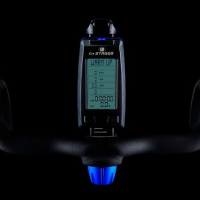
When first turning on the console, explain that the “Warm Up” screen is the optimal time to pair a heart rate monitor. Once they press the stage button, they will see that the console now displays information on both the left and right sides. The left column is their real-time information—what they are doing right now. The power meter is sending data to the console every second. The right side is their average data for the stage they are in.
Have them perform simple drills such as increasing their cadence or adding more resistance to see how the two sides of the console display information. As they increase their intensity, the left side will instantaneously display the change in effort; the right side will adjust for the averages and may not change right away (unless they are doing a very powerful effort).
The stage button acts as a lap timer, which enables you to do fun, repeatable drills and allows you to compare metrics. An example of a fun, easy-to-understand drill is a distance challenge. Start by pressing the stage button. How far can you go in 3 minutes? Memorize that distance, press the stage button again, and rest for 2 minutes before trying it again. Can you go farther the second time? Repeat the drill again by pressing the stage button and trying to improve the distance a third time. This excellent drill allows them to explore at their own pace and should pique their curiosity.
A good drill to explore the cadence and resistance ratio explained above is to begin at a wattage that feels fairly “easy” to them (just use perceived exertion for now). Have them hold their cadence constant at about 70 rpm and observe what happens as they gradually increase resistance. Note how wattage increases. Next, do the same thing at 80 and 90 rpm. Finally, return to the previous “easy” wattage you started at before, but this time hold resistance constant and gradually over a few minutes increase cadence from 70 to 100 rpm. How does wattage increase and how does it feel? This series of drills will set off some light bulbs in their head that both cadence and resistance will impact their power output.
- Embrace the challenge of change.
Some people have a natural tendency to avoid change (shocker, I know!). But think of this new technology in the same way you may have had to adapt to changes in cell phones, computers, or even cars. It took some time to get used to the new features, but they are there to enhance your daily life, just like the new features on the bikes are there to enhance your workout experience. Being able to see measurable progress is extremely motivating to participants of all ages. We want participants to keep returning to class, and by providing them with better ways to track their smart, focused goals, we can ensure them success!
- Have FUN!
People come to your classes because they love what you do, and how you already teach your classes. Use the new technology not to change the way you teach, but to enhance it. In your first few classes use a playlist you and your participants already know and love. There is comfort in the familiar. Once you get them engaged, you will have plenty of time to expand their knowledge base regarding the use of metrics and data.
Now that you have your participants sold on this new technology, questions will start to arise. One of the most commonly asked questions is “What watts should I see?” The answer is that wattage is highly individual and it’s best to perform some type of FTP (functional threshold power) assessment to determine their baseline. While a 20-minute FTP test is going to be much more accurate (and should be a future goal at your studio), you can start off with simpler and less intimidating 3-minute tests. Your certification will explain how to do those.
Now you’ve got them hooked!
Remember, one of the best things you can do as an instructor is to keep learning and growing. Consider attending certifications, workshops, and conferences to expand your own personal knowledge. Read books and articles written by legitimate experts in the field. And join ICA!
In the case of teaching indoor cycling with metrics, knowledge (literally) is POWER!
Additional Power Resources:
Estimating Functional Threshold Power
You’ve Got Your FTP Number…Now What?
20-Minute FTP Test: Coaching Play by Play
FTP Field Testing Music Tips and Suggestions
Class Profile: The Ultimate HIIT—Teaching With Power